Home | FAQ | Share Your Feedback | Contact Us | Sitemap | Français   Facebook
Facebook
Home | FAQ | Contact Us | Sitemap | Français   Facebook
Facebook
Home
About Us
What's new ?
Who we are
Commitment to quality
Community involvement
Careers
Products
White Cedar Shingles
Samples
Quote
Natural
Factory Coated Shingles
Victorian Series
Laths
Fence Boards and Moulded Pickets
By-products
100% Green
Photo Gallery
Technical Information
Calculator
Installation
Best Product
Material Safety Data Sheet
Warranties
MAIN CATEGORY
Dealers
FAQ
Share Your Feedback
Contact Us
Sitemap

Français
blank image blank image

Technical Information > Installation


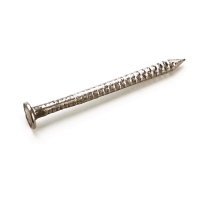
 Roofing nail

Roof installation

Using the Right Nails

  • First be sure to use rust-resistant nails to nail down wood shingles.
  • Nails must be long enough to go 128 mm (1/2 in.) into the sheathing or deck. Some codes require that nails go 132 mm (3/4 in.) into the deck.

Starting Right

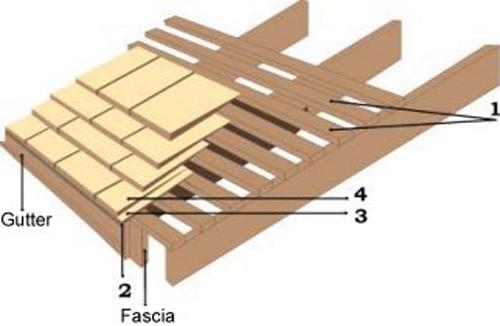
  1. Install spaced sheathing. Cedar shingles must always be nailed to sheathing for ventilation. Check building codes to make sure proper sheathing is used for the type of building being roofed.
  2. Install drip edge and valley flashing material.
  3. Install a starter course at the eaves of the roof, allowing a 4 cm (11/2 in.) overhang beyond the eaves fascia and a 128 mm to 192 mm (1/2 in. to 3/4 in.) overhang beyond the rake fascia.
  4. Install the first course of wood shingles on top of the starter course. If required (heavy snow regions), overlay the starter course with two layers of shingles.

    To align the starter course and first course, nail down a shingle with the correct overhang on each end of the eaves. Drive a nail into the butt of each shingle and stretch and tie a string between the nails.

Installing Cedar Shingles

Doing It Right

  • Every third or fourth course, measure from the eaves up to the butts of end shingles and snap a chalk line to align butts of the next course of shingles.
  • To allow for expansion, space shingles 3 mm to 6 mm (1/8 in. to 1/4 in.) apart. (Depending on degree of humidity.)
  • Offset adjacent cedar shingle courses by at least 4 cm (11/2 in.). For heavy snow regions, increase to 5 cm (2 in).
  • Do not let two joints line up directly in any three courses.
  • Use two nails at 2 cm (3/4 in.) from each edge of the shingle and 4 cm (11/2 in.) above the exposure or butt of the succeeding course.
  • Avoid cutting roofing shingles at ridge by shortening exposures of last few courses installed below ridge. 

Cedar Breather

 Cedar Breather®

Cedar Breather® is the solution for preserving the beauty and life of wood roofing. As an underlayment for wood shingles and shakes, Cedar Breather provides space for a continuous air flow between the solid roof deck and the cedar shingles. Benjamin Obdyke's patented three-dimensional design allows the entire underside of the shingle to dry, eliminating excess moisture, preventing thermal cupping and warping, and reducing potential rotting. For quick and easy installation, Cedar Breather rolls out over standard 30 lb. felt, installs without any special tools, and eliminates the need for furring strips. Its fire-resistant nylon matrix remains unaffected by UV light, heat or cold, for long-lasting, durable performance. 
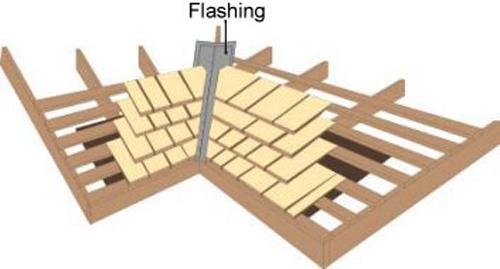

Roof valleys


Cedar Shingle Valley


  • After flashing is installed, shingle away from both sides of the valley.
  • This way, all cedar shingles adjacent to valleys can be cut using the same pattern.
  • Install wood shingles to within 5 cm to 10 cm (2 in. to 4 in.) on each side of the centre line of valley.
  • Never allow joints between shingles to break into a valley: make sure all joints have a solid shingle beneath and on top of them.
  • Never lay cedar shingles with the grain parallel with the centre line of a valley.
  • Cedar shingles should lap at least 18 cm (7 in.) over each side of valley flashing.

WALLS

New Construction:

  • Install metal flashing above window and door openings, and caulk around openings.
  • Installing metal flashing over all inside corners is also recommended.
  • Make sure all door and window casings are in place before starting shingling.
  • Exposure on wall wood shingles can be much greater than roof shingles as walls are less exposed to weather conditions.
  • For quantity of shingles required, refer to the "Calculating the right quantity" section.
  • First row should always be two cedar shingles thick and protrude at least 2.5 cm (1 in.) from top of foundation

Shingling Existing Walls

Shingles are always nailed to 2.5 x 10 cm (1 x 4 in.) wooden laths fixed directly to the frame or existing wall covering.For courses, exposure and installation of shingles, follow steps for new construction walls. 
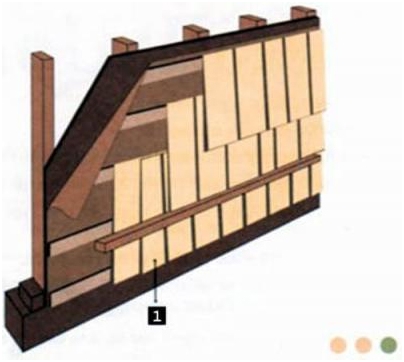

Wood Shingle Wall Siding

Proper ventilation is essential:

  • For shingling roofs or walls, proper ventilation is essential for durability, quality and longevity.
  • Proper ventilation reduces moisture considerably.
  • Proper ventilation with lath sheathing results in significant savings in energy costs.
  • Always install cedar shingles over spaced sheathing, using 3 cm x 10 cm (1 in. x 4 in.) laths.
  • Shingle exposure should not be more than 15 cm (6 in.).
  • Installing a mesh screen is necessary to prevent insects from getting in through ventilation space on corners, edges or walls.
  • Lath sheating should be nailed in a staggered pattern: 4 nails to form a square and 1 nail in the middle. 


Home Slicker

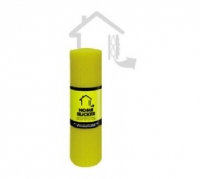
Home SlickerTM

Home Slicker effectively drains moisture from behind the siding, reducing the chances of premature peeling or blistering of finishes.Home Slicker’s unique three-dimensional Nylon matrix provides a continuous space for drying, channels for drainage, a thermal break, and pressure equalization, allowing moisture to escape quickly before it damages the sidewall materials. Wood, fiber cement and EIFS systems, as well as brick and vinyl, are ideal cladding systems for use with Home Slicker. With quick, easy installation, Home Slicker provides maintenance-free protection for the home.

Home Slicker™ is the answer for protecting wall systems from the damaging effects of moisture. Wind-driven rain from the outside, moisture vapor from the home’s interior, and corrosive surfactants that leak from certain types of siding, usually remain trapped in between the siding and building paper or housewrap. This unvented moisture can negatively impact the performance of siding systems and building paper or housewrap. It can also lead to the development of mold and mildew in the wall space, potentially creating health concerns. Unvented moisture behind cladding systems can also cause premature failure of paints or stains.
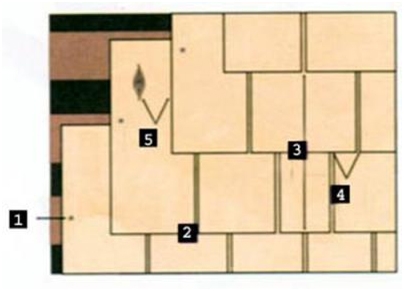
Details on aligning

Helpful details on aligning

  1. Place two nails 2 cm (3/4 in.) from each edge of the cedar shingle and 4 cm (1 1/2 in.) above the exposure.
  2. To avoid buckling, allow 3 to 6 mm (1/8 to 1/4 in.) space between each shingle for expansion (depending on degree of humidity).
  3. Joints must not line up with joints in the two courses below.
  4. There must be at least 4 cm (1 1/2 in.) space between joints in successive courses.
  5. Joints must be placed in alternating rows, at least 4 cm (1 1/2 in.) from the start of imperfections. 

Cedar Shingles

Chimneys

Chimneys

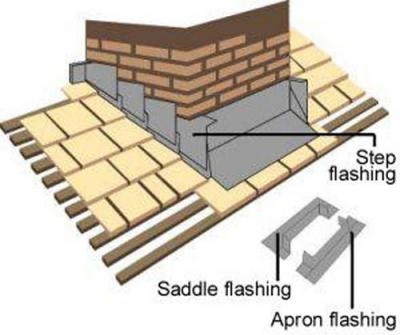
  • Saddle flashing goes upslope of chimney.
  • Apron flashing goes on the downslope side.
  • Cricket flashing may be used instead of saddle flashing.
  • Extend apron flashing at least 8 cm (3 in.) up the vertical surface.
  • It should go at least 11/2 times the cedar shingle exposure (minimum 15 cm or 6 in.) over roof slope.
  • Carry cricket flashing at least 25 cm (10 in.) under the shingles.
  • Extend step flashing over the roof at least 8 cm (3 in.) and up the chimney. Cover by at least 10 cm (4 in.) with counterflashing.
  • Lap each step flashing over next piece by at least 8 cm (3 in.).
  • Install counterflashing to extend down within 3 cm (1 in.) of finished roof surface. 

Installation of Chimney Flashing

Fasteners

Recommendations for Fasteners

Materials: Only corrosion resistant nails or staples shall be used in applying Eastern White Cedar shingles, hip and ridge units and starters. Stainless steel (Type 304 or 316), aluminum, or hot-dipped zinc-coated steel nails and stainless steel staples have proven to give good service. Bright or blued steel and electro-galvanized nails and staples are not recommended.

Nails: Nails shall meet local building code requirements. Nails shall be long enough to penetrate through, or at least ¾” (19 mm) into the sheathing, battens, or furring, when driven flush with the surface of the shingle.

Note: The 1995 National Building Code of Canada (NBC 1995) specifies the use of nails having a minimum head diameter of 0.19” (4.8 mm) and a shank thickness of not less than 0.08” (2.0 mm).

Nailing Chart – Roofs

  Type  Gauge & Minimum
Nail Length

 Number of Nails
New Roof Shingles  16"
(400mm) shingles 
1 ¼" (32 mm) long
No. 14-½ gauge
2 only 
Re-Roof Shingles  16"
(400mm) shingles 
1 ¾" (44mm)
long box nails
2 only 

Note: For thick material, nails should penetrate through, or at least ¾” (19 mm) into the sheathing.

Nailing Chart – Sidewalls

Type Gauge & Minimum
Nail Length
Minimum
Number of Nails
Maximum
Nail Spacing
16" (400mm) Shingles 1 ¼" (32 mm) long
No. 14-½ gauge
2 3 nails in shingles over
8" (200mm) wide
Double-Course sidewall 1¾" (44 mm)
long casing nails
2 4"
(100mm) on center 

Note: For thick material, nails should penetrate through, or at least ¾” (19 mm) into the sheathing.

Staples :

Staples shall be minimum 16 gauge or of equivalent cross-sectional area with a crown width of 7/16” (11 mm). Staples shall be long enough to penetrate through, or at least ¾” (19 mm) into the sheathing, battens, or furring, when driven flush with the surface of the shingle. Staples shall be driven so that their crown is aligned parallel to the exposure line, i.e. across the grain of the shingle.